
A spa-like bathroom doesn’t have to mean a remodel, custom tile, or some bloated luxury-toilet purchase that eats your whole budget in one bite. Most of the feeling people want isn’t coming from a full renovation anyway. It comes from atmosphere. Softer light. Better sound. A little warmth at the right moment. A few thoughtful upgrades that make an ordinary bathroom feel calmer, more comfortable, and a lot less harsh first thing in the morning.
That’s the good news. You can get surprisingly far on a modest budget if you stop thinking in terms of remodeling and start thinking in terms of sensory upgrades. You don’t need an electrician for any of this. None of this requires rewiring your walls or changing your GFCI outlets. And if you’re renting, that matters. It keeps the whole project practical, reversible, and much less intimidating.
To me, that’s what makes this kind of bathroom project so appealing. You’re not trying to rebuild the room from scratch. You’re just trying to make it feel better to walk into every day.
RELATED: How to Automate Your Bedroom for Better Sleep
The Quick Answer
If you want the bare minimum for a spa-like smart bathroom under $500, start with:
- Warm accent lighting instead of harsh overhead-only lighting
- A motion trigger or schedule so the room responds automatically
- A waterproof speaker or simple voice-controlled audio setup
- A smart plug paired with a basic towel warmer
- One comfort hardware upgrade, like a bidet attachment or better showerhead
- Cheap finishing items that hide cords, reduce clutter, and keep the setup renter-friendly
That’s enough to make a standard bathroom feel warmer, quieter, and more intentional without tearing into walls or blowing your budget.
The Recipe Ingredients
Before we get into the deeper explanations, here’s the actual ingredient list for a budget-friendly build.
You’ll usually want:
- One warm-white LED strip or soft accent light
- One motion sensor or app-based routine
- One smart plug
- One waterproof Bluetooth speaker or shower-friendly audio option
- One plug-in towel warmer rack or bucket-style warmer
- One bidet attachment or upgraded showerhead
- A few adhesive clips, cable covers, and mounting accessories
A realistic setup list looks something like this:
- Accent lighting and sensor: Philips Hue Motion Sensor + Philips Hue Solo Lightstrip
- Audio: JBL Go 4 waterproof Bluetooth speaker
- Smart plug setup: Kasa Smart Wi-Fi Plug Mini
- Towel warmer: Plug-in towel warmer
- Bidet attachment or showerhead upgrade: Brondell FreshSpa Thinline Precision Essential Bidet Attachment
- Small accessories and mounting items: Command Clear Decorating Clips
That gives you a clear shopping framework without turning the whole project into an overpriced gadget pile.
Who This Setup Is For, And Not For
This setup is for the person who wants their bathroom to feel better without turning it into a renovation project. It’s especially good for renters, apartment dwellers, condo owners, or anyone working with a standard builder-grade bathroom that feels too bright, too plain, or too sterile. It’s also a strong fit for people who want a morning routine that feels less abrupt and a nighttime routine that feels a little calmer.
It’s also for people who like convenience but don’t want a complicated smart-home mess. You’re not trying to build a theme park attraction in the powder room. You’re trying to make the room softer, warmer, and easier to enjoy.
It isn’t for someone who wants every fixture to be voice-activated just because that sounds futuristic. And it isn’t for someone expecting this to feel like a five-star resort on a tiny budget. Budget smart upgrades can absolutely improve the room, but they work best when expectations stay grounded. You’re elevating the experience, not teleporting into a hotel penthouse.
From where I sit, this setup makes the most sense for people who care more about how the room feels than how flashy the product list looks. That’s usually the smarter way to spend money anyway.
The Big Beginner Trap
The number one mistake beginners make is overspending on the wrong category.
They blow half the budget on one flashy hero item, usually a fancy speaker, a trendy mirror, or some “smart” object that barely changes the way the room feels. Then there’s no room left in the budget for lighting, warmth, or the practical details that actually make the bathroom more pleasant to use.
That’s backwards.
In a spa-like bathroom, balance matters more than any single gadget. Soft light matters. A little warmth matters. Good audio matters. Convenience matters. Most people don’t walk into a bathroom and fall in love with one device. They respond to the whole mood of the room.
If it were my money, I’d rather have softer lighting, a warm towel, and one good hardware upgrade than blow the whole budget on a single premium device that looks impressive in a product photo and doesn’t do much for the actual experience.
The best way to avoid the trap is to divide the budget across categories. Give yourself a lighting budget. Give yourself a comfort budget. Give yourself a hardware budget. Then leave a little room for the boring accessories that make the whole thing cleaner, safer, and easier to live with.
RELATED: How to Keep Your Smart Mirror from Fogging
Upgrade the Lighting (Ditch the Interrogation Lights)
Nothing makes a bathroom feel more hostile than harsh overhead lighting blasting straight down at full brightness the second you walk in. It’s a rough way to wake up, and it’s not much better late at night. A spa-like bathroom should feel calm when you enter it, not like you’ve stepped into a medical exam room with opinions.
The easiest fix isn’t replacing the whole lighting system. It’s adding a second layer of low, warm light.
Under-vanity lighting is the sweet spot here. A warm LED strip hidden under the vanity can throw a soft glow across the floor and baseboards, which makes the room feel much more expensive than it is. Pair that with a motion sensor or a simple routine, and suddenly the bathroom responds to you instead of demanding full overhead commitment every time.
A good target is a warm, low-brightness glow for early mornings and late nights. You don’t need the room fully lit when you stumble in half awake. You need enough light to navigate comfortably without getting smacked in the face by your own fixtures.
If you’re using lighting in a bathroom, pay attention to IP ratings, especially if anything is going near splashes, steam, or sink zones. In simple terms, an IP rating tells you how well a device is protected against moisture and dust. For a renter-friendly accent setup, keep the LED strip outside direct water contact, mount it in a low-splash area like under the vanity, and choose products that are actually intended for indoor smart lighting use rather than random bargain-bin strips with mysterious specifications.
If you want to keep it renter-friendly, use adhesive-backed LED strips and a removable mounting approach wherever possible. No cutting drywall. No rewiring. No electrician. That’s part of the beauty here. You’re adding atmosphere, not opening a project folder.
In my view, I’d start here before anything else. Lighting changes the feel of a bathroom faster than almost any other upgrade, and it usually gives you the biggest payoff for the least amount of effort. Keep the existing vanity lights for shaving, makeup, or the occasional task that actually needs visibility, but make the ambient layer your everyday comfort layer. This is what changes the room.
Automate the Audio (Seamless Shower Soundtracks)
A spa-like bathroom without sound can still feel good, but sound is often what makes it feel finished.
Now, there are two bad ways to do this. The first is dragging your phone into the bathroom and balancing it near the sink like you’re asking water damage to ruin your week. The second is buying some absurdly expensive built-in system that makes no sense in a budget setup.
The better approach is simple. Use a dedicated waterproof speaker, or use a showerhead audio option if that’s more your style. If you already have an Echo Dot, Nest speaker, or another smart speaker sitting safely away from the wet zone, pair it with a waterproof Bluetooth speaker for shower use or keep the smart speaker on the vanity for music, podcasts, and voice timers.
This works well because it separates control from exposure. The main assistant device stays dry. The shower audio device handles the water-heavy environment. Everyone stays in their lane, which is more than can be said for most people’s renovation plans.
This is another place where IP ratings matter. If a speaker is going anywhere near the shower or sink, look for a model with a stated water-resistance or waterproof rating rather than guessing based on marketing photos. A speaker that looks rugged isn’t the same thing as one that’s actually rated for wet conditions, and bathrooms are not the place for optimism.
The trick here is restraint. You don’t need huge sound in a bathroom. You need clean, easy audio that starts quickly and doesn’t make the setup feel fiddly. If your system takes five steps every morning, you’ll stop using it. Convenience always wins.
My preference would be a simple waterproof speaker before spending more on a showerhead with built-in audio. It’s cheaper, more flexible, and easier to replace later if you change your mind. A speaker-equipped showerhead is more integrated and feels more built in, but it’ll usually eat more of the budget. Either can work. Just don’t let the audio category consume the whole project.

|

|

|

|
|
$39.99
|
$44.95
|
$24.99
|
$63.00
|
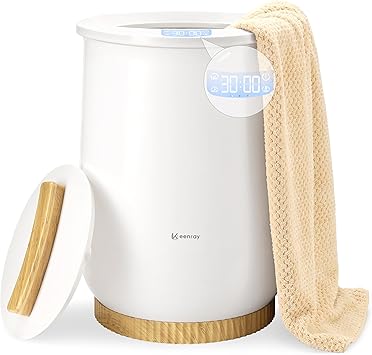
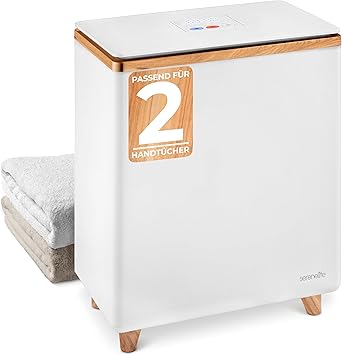
Add Warmth (The Smart Towel Hack)
This is the sneaky good upgrade. It’s not flashy, but it changes the experience in a way people notice right away.
Dedicated smart towel warmers can get expensive fast, and that’s where a lot of budget guides drift off course. They start pretending a luxury appliance is somehow affordable because they’ve stopped respecting the math. The better move is the budget hack: buy a normal plug-in towel warmer rack or bucket-style warmer, then plug it into a smart plug and automate it.
That’s it. That’s the trick.
It also works beautifully for renters because it’s reversible. You’re not mounting permanent heating hardware. You’re using a normal plug-in product with a simple automation layer on top.
Now, a small but important safety note: keep the towel warmer on a properly functioning bathroom GFCI-protected outlet, keep the plug and cord away from wet areas, and don’t use extension cords for this kind of heat-producing device. Check the towel warmer’s power requirements and make sure if you’re using a smart plug, that it’s compatible. This is not the place for reckless improvisation. Stay within the plug’s load rating, use grounded outlets where required, and don’t turn a comfort upgrade into a preventable safety problem.
For my money, this is one of the best value upgrades in the entire article. It feels a lot more luxurious than it costs, and it doesn’t require much effort once it’s set up.
|

|
|

|
|
$89.99
|
$148.99
|
$99.99
|
$83.99
|
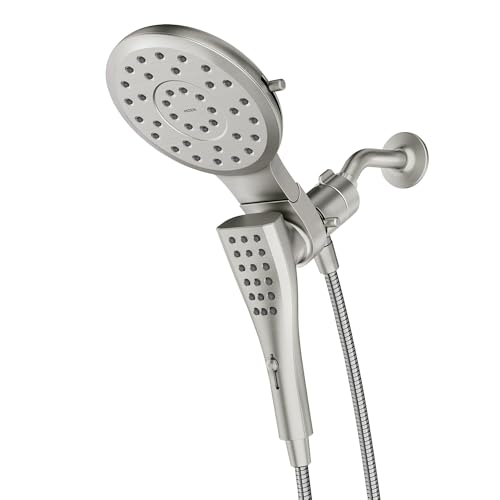
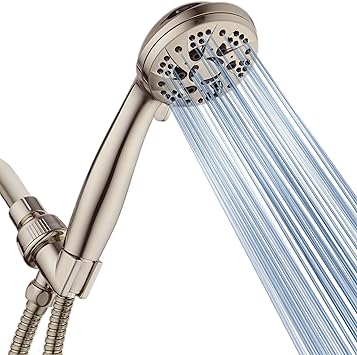
Elevate the Hardware (Bidets and Showerheads)
You do not need a $2,000 smart toilet to make a bathroom feel upgraded. That’s luxury marketing talking, and luxury marketing loves pretending the only path to comfort is financial self-harm.
A simple bidet attachment can make a standard toilet feel dramatically more upscale in everyday use. It’s one of the highest-value bathroom upgrades, period. Many attach under the existing toilet seat, don’t need electricity, and don’t require major installation work. For renters and budget-conscious buyers, that matters.
On the shower side, even a small upgrade can change the feel of the space. A better showerhead, a handheld combo, or a showerhead with a built-in speaker can make the daily routine feel more polished. You can also go playful with a water-powered LED showerhead if you like a little visual flair, though I’d treat that as fun accent energy rather than essential spa realism.
If you’re trying to keep the budget tight, choose one main hardware upgrade, not three. Either do the bidet attachment and keep the shower simple, or upgrade the shower experience and hold the line elsewhere. This is one of those categories where discipline matters.
My instinct would be to prioritize the bidet attachment first if the bathroom is otherwise pretty standard. It changes the everyday experience more than people expect, costs less than a lot of trendier smart gear, and doesn’t rely on batteries, recharging, or app nonsense.

|

|
|
|
|
$45.99
|
$88.97
|
$81.79
|
$22.09
|
Keep It Renter-Friendly and No-Wiring
This deserves its own section because a lot of people will bounce from articles like this the second they think it involves electrical work.
It doesn’t.
You don’t need an electrician for any of this. None of this requires rewiring your walls or changing your GFCI outlets. The smartest budget bathroom upgrades are the ones that layer on top of what’s already there. Adhesive lights. Plug-in devices. Smart plugs. Portable speakers. Add-on bidets. Replacement showerheads. That’s the lane.
If you rent, this is exactly what you want. Improvements you can install in an afternoon, remove later, and take with you. The bathroom doesn’t need to become a construction site just to feel calmer.
To me, this is one of the most reassuring parts of the whole project. You can make the room feel noticeably better without crossing into complicated install territory.
The Boring But Mandatory Accessories
These are the little items people forget until they’re halfway through setup and annoyed at themselves:
- Smart plug for the towel warmer or accent light
- Adhesive cable clips
- Removable mounting strips
- Waterproof extension management box if needed outside the wet zone
- Extra adhesive-backed cord covers
- A short surge protector with enough spacing for bulky adapters
- A timer or routine inside your smart-home app
- Replacement adhesive tabs for renter-safe mounting
- Soft, washable bath mat that actually fits the new layout
- Storage tray or caddy so the counters don’t ruin the mood
None of this is glamorous, which is exactly why it matters. A bathroom can have good products and still feel cheap if the cords are visible, the counters are cluttered, and everything looks like it was thrown together in a panic.
If it were up to me, I wouldn’t skip this part. The accessories are what keep a smart setup from looking temporary or sloppy.
Final Build Order
If you’re starting from scratch, here’s the smartest order:
- Fix the lighting first
- Add audio second
- Add the towel-warmer automation
- Choose one hardware upgrade
- Clean up the cables and accessories last
That order works because lighting changes the room fastest, warmth adds the most obvious comfort, and the hardware upgrade gives the bathroom one memorable touch without derailing the budget.
My advice would be to build this in stages rather than ordering everything at once. Start with the lighting, live with it for a few days, then add the next layer. That usually leads to better decisions and fewer random purchases you regret later.
A spa-like smart bathroom on a budget is really just a room that stops being harsh and starts being intentional. Softer light. Better sound. Timed warmth. One or two upgrades that feel luxurious without requiring a second mortgage or a weekend of electrical guesswork.